How to Use WordPress Widgets
Widgets provide a user-friendly way of adding design and structure controls to WordPress websites. Although widgets are commonly placed in sidebars, a developer could place any widget in the header, footer or any other location within the theme.
Widgets are an excellent way of extending and enhancing the website capabilities of the website without writing a single line of code. In all instances, users could add widgets using the WordPress Theme Customizer. Widgets could be easily accessed through Theme Customizer or Appearance > Widgets.
In a WordPress website, widgets are the most versatile component and could contain anything from a simple image to a complex script. Developers place forms, calendars and other design and/or functionality elements in widgets.
As the CMS itself has updated in time, it now offers you multiple customization options for your widgets. It can be forms that you fill out, includes or excludes of data and information, optional images or other customization features. For instance, widgets could be used to add custom sidebars to a theme that lacks the functionality in the first place. Widgets often come in bundles that could be accessed from WordPress Plugin Directory.
How to Display WordPress Widgets
Support is the most basic issue for widgets. Different themes support a different mix of widgets and you should definitely check out the theme’s documentation for supported widgets. Additionally, the supported widgets are also available under Appearance > Widget menu.
If the website’s theme supports Theme Customizer, follow the following steps:
- Go to Appearance > Customize in the WordPress Administration Screens.
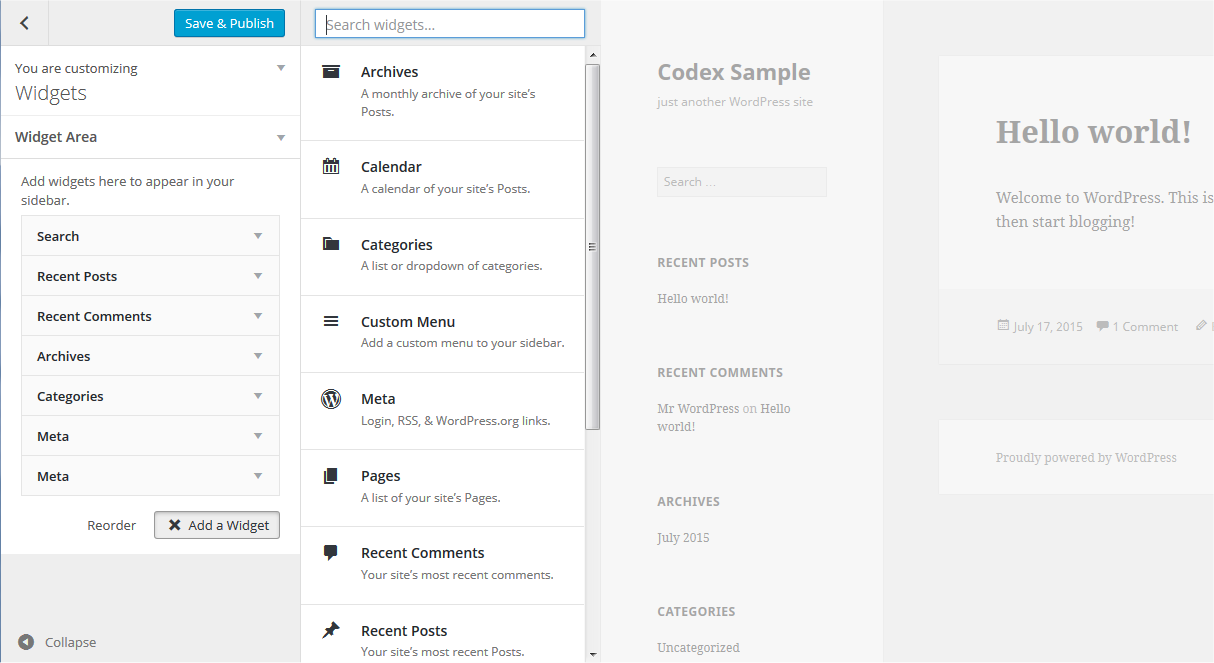
- Click the Widget menu in the Theme Customizer to access to the Widget Customize Screen.
- Click the down arrow of Widget Area to list the already registered Widgets.
- Click Add a Widget button at the bottom of sidebar. It shows the list of available widgets.
- Click a widget you want to add. The widgets should be added in the sidebar.
- Preview your site and you should see the content from your new Widget.
- To arrange the Widgets within the Sidebar, drag and drop the widgets in the order you want or click Reorder link and click up arrow and down allow of each widget and click Done after performing the arrange operation.
- To customize the Widget features, click the down arrow in the right to expand the Widget’s interface.
- To remove the widget, click Remove from Widget’s interface in above step.
You can live preview the changes you make from the Theme Customizer.
It often happen that the installed theme does not support a particular widget. In such cases, the following steps prove to be helpful:
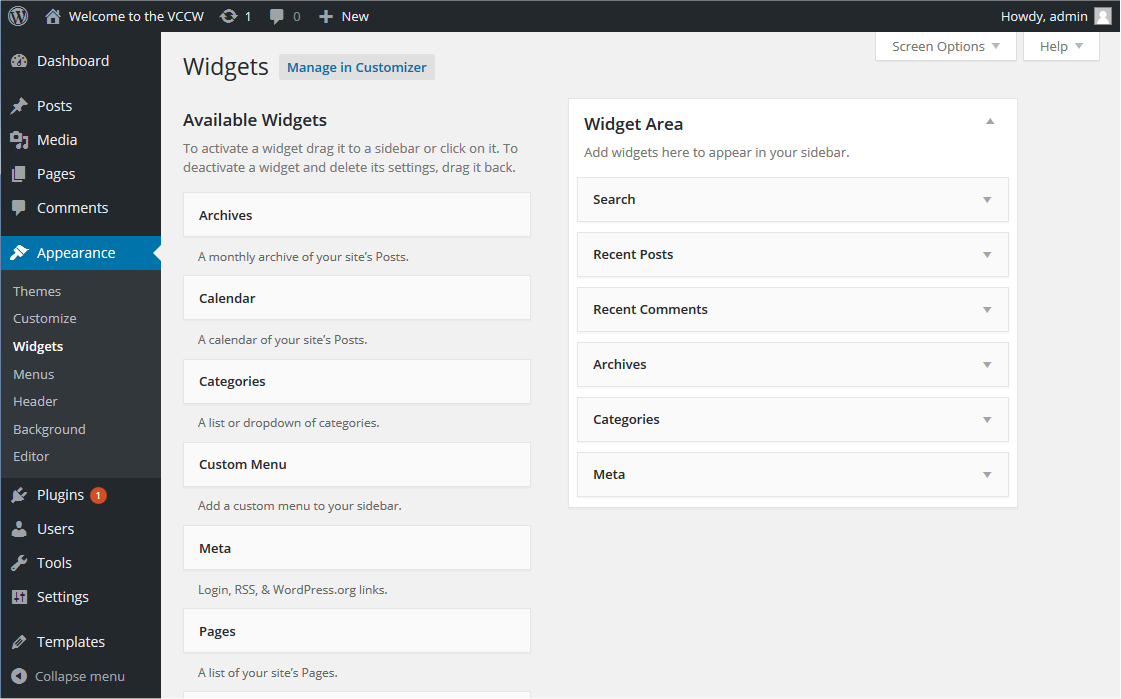
- Go to Appearance > Widgets in the WordPress Administration Screens.
- Choose a Widget and either drag it to the sidebar where you wish it to appear, or click the widget, (select a destination sidebar if your theme has more than one) and click the Add Widget button. There might be more than one sidebar option, so begin with the first one. Once in place, WordPress automatically updates the Theme.
- Preview the site. You should find that the “default” sidebar elements are now gone and only the new addition is visible.
- Return to the Widgets Screen to continue adding Widgets.
- To arrange the Widgets within the sidebar or Widget area, click and drag it into place.
- To customize the Widget features, click the down arrow in the upper right corner to expand the Widget’s interface.
- To save the Widget’s customization, click Save.
- To remove the Widget, click Delete.
You can deactivate the widgets if you do not need them anymore. While, this removes the widgets from active usage, they are still available for future use. This feature comes in handy when you are switching themes on your WordPress website.
Widget Areas
In many themes, widget areas are usually located in the sidebars. However, modern themes support several widget areas distributed evenly across the design of the page to make sure that the designers and developers have maximum freedom for implementing the design that they have in mind. To reposition a particular widget area, you need to check out the appropriate section(s) of the Codex.
What Are Text Widgets and How to Use Them?
While their name might suggest limitations, text widgets are versatile components that work equally well with text, video, images, custom lists, media players, HTML/XHTML and much more, making them the most commonly used widgets on WordPress websites. In order to use WordPress text widgets on your website, follow these simple steps.
- Go to Appearance > Customize in the WordPress Administration Screens and click the Widget menu in the Theme Customizer. Or Go to Appearance > Widgets in the WordPress Administration Screens.
- Open the sidebar to which you wish to add the Text Widget.
- Find the Text Widget in the list of Widgets.
- Click and drag the Widget to the spot you wish it to appear.
To open and edit the text widget:
- Click the down arrow to the right of the Text Widget title.
- Set the Text Widget Title (optional).
- Add the text or HTML code to the box or edit what is currently there.
- Choose the option to Automatically add paragraphs to wrap each block of text in an HTML paragraph tag (recommended for text).
- Click Save to save the Text Widget.
- Click Close to close the Text Widget.
- Switch tabs in your browser and preview the results and make changes if necessary.
Once you are done with adding a Text Widget to your website, you can add style to your widgets by using the Widget CSS Classes plugin.
Adding Code to Text Widgets
You can add basic HTML, embed codes, and JavaScript to widgets. In particular, embed codes from social media websites and multimedia work perfectly with a WordPress text widget. However, code in programming languages such as PHP will not work as the widget will skip the code.
To add active code to a text widget in WordPress, you need specific WordPress plugins from the repository that can override WordPress coding restrictions. In the case of PP, you could use PHP Code Widget.
RSS Widgets
Near the end, I will discuss RSS widgets. These widgets allow you to add an external RSS feed Plugins source as content into the website. The feed could come from any social media platform or blog of your choice.
Follow these steps to add RSS widgets to your WordPress website:
- Enter the RSS feed URL in the first box, copied from the source page for the content you wish to include in your sidebar or other widgetized space.
- Give the feed a title: This is optional and gives you the chance to showcase the source of the content.
- How many items would you like to display: By default, 10 are shown, but you can choose from 1-20 posts.
- Display item content: This allows you to show an excerpt of the content not just the title.
- Display item author if available: If you wish to give credit to the original author of the content, check this to display the author.
- Display item date: If available, the date of the original content will be shown.
You can add as many RSS feeds you want to the website by accessing the widget area in the sidebars.
Conclusion
In this article, I introduced widgets for WordPress website. In addition, I also discussed several plugins and the proper procedure for adding these widgets to the website. If you find the article interesting and informative, don’t forget to share it among your readers.
Create Faster WordPress Websites!
Free eBook on WordPress Performance right in your inbox.
