Installation of a Plugin in WordPress from the Back End
Plugins are tools that allow you to add additional functionality to your WordPress website. Installation of plugins can be as easy as it gets. To add a plugin file to your WordPress, you just need to place the specific plugin file in your ‘wp-content/plugins’ directory. This aspect is automatically fulfilled when you navigate to your WordPress dashboard and select Plugins menu option and then navigate to Add New.
Beyond being one of the best CMS applications in the world, WordPress offers powerful application hosting capabilities. This flexibility allows you to design not only websites but also simple web applications to meet your diverse needs.
With themes and plugins only a click away, one have the upper hand in creating a website without involving themselves into the hassles of complex coding. Plugins add advanced functionality to your WordPress website making WordPress itself a highly flexible tool. You can create an ecommerce web store, a portfolio website, a business website, a gallery website and much more.
The Plugins menu option in WordPress allows you to search up the plugin you desire, install and activate it. Today, we are going to educate how one can easily install plugins to the backend of their WordPress website.
The simplest way of installing a specific WordPress plugin is by using Plugin Search. To do so, it is necessary for the plugin to be available in the WordPress plugin repository. However, all the plugin available in WordPress plugin directory is absolutely free.
All you have to do is Navigate to the WordPress admin area and select Plugin >> Add New. The downside, however, all the plugin available in WordPress plugin directory are absolutely free.
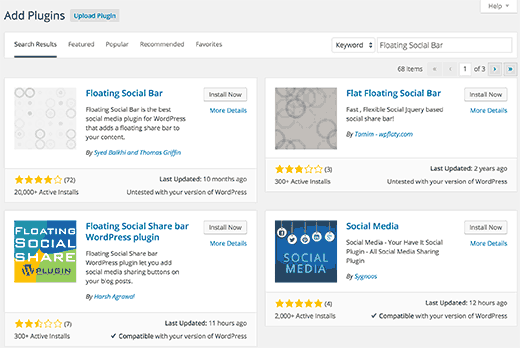
A screen will pop up with a number of options that can help you identify which plugin you are looking forth to use. Write the name of the plugin you are searching for, in the WordPress Search Bar. Select the plugin and download it from the plugin repository containing a wide range of free plugins.
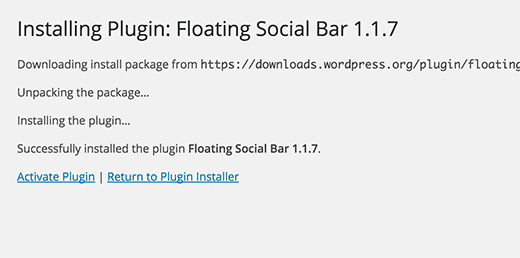
Once you select the respective plugin, it will lead you to a download option. Select the download option and the WordPress will transfer you to a new page. Here you can Activate the plugin. With the activation, you can easily find the plugin options appear in your WordPress admin sidebar.
Depending on the functionality of the plugin, it may appear as a floating icon on your website, a live chat support, RSS feeds, Social Media widgets, almost anything you want your website to look like.
As far as the configuration is concerned, we will discuss it in our upcoming articles.
To further observe the demonstration of how a plugin can be installed in WordPress please check out the video below,
If you are still code frenzy and you wish to tweak it for a bit, use localhost and Install WordPress plugin manually. Here is a video demonstration on how to manually install a plugin using WordPress localhost,

Create Faster WordPress Websites!
Free eBook on WordPress Performance right in your inbox.

Moeez is ‘The’ blogger in charge of WPblog. He loves to interact and learn about WordPress with people in the WordPress community. Outside his work life, Moeez spends time hanging out with his friends, playing Xbox and watching football on the weekends. You can get in touch with him at moeez[at]wpblog.com.