WordPress .htaccess File: What It Is and What You Can Do With It!
Disclaimer: WPblog is a part of Cloudways, a Managed Cloud Hosting service, but any assumptions or analysis made on this property belong solely to their writers.
What is WordPress .htaccess file? If you’re asking this question, then you’re already on the right track to become a great WordPress developer, because knowing what each file does in WordPress is important. And if you break down and understand what each file does in the WordPress file structure, everything becomes easy to digest.
In this article, though, I’m going to focus on the .htaccess file in your WordPress website and teach you how to optimize your site’s speed, improve its security, and other useful ways to utilize the WordPress .htaccess file.
Table of Content
- What is WordPress .htaccess file?
- Before we begin
- How to access .htaccess file
- What Can You Do with Htaccess File in WordPress
- Setting up Redirects
- 301 (Permanent) Redirect
- 302 (Temporary) Redirect
- Force URL to www
- Force URL to Non-www
- Force HTTPs
- Force HTTP
- Redirect Domain To Sub-Directory
- Redirect a Primary Domain to Another Domain
- Removing the Query_String
- Setting the language variable based on Client
- Redirecting WordPress Feeds to Feedburner
- Optimizing WordPress Speed Using htaccess Rules
- Improve Your WordPress Website’s Security
What is WordPress .htaccess file?
The WordPress .htaccess file is one of the core files that can be used to optimize the speed of your website, improve its security, and also set specific redirection rules on your WordPress website.
The main purpose of htaccess is to define rules for web servers (Apache) on how to operate your website (WordPress). The default WordPress .htaccess file controls how pretty links (permalinks) are displayed on your WordPress site, but there is a lot more you can do with htaccess file in WordPress.
Before We Begin
Editing WordPress files without a backup is never a good idea. Hence, I suggest that you employ one of the following methods before we edit the htaccess file:
Backup WordPress Website – You should have a backup policy, which is one of the most foolproof security steps that you should take by backing up your entire WordPress website.
Also read: Best WordPress Backup Plugins
Create a local copy of your WordPress website – You can install WordPress locally on your Mac or PC and copy your live website to it to make edits. If everything works well, you can copy your htaccess file to your live site (won’t work for URL redirect rules, though).
Create WordPress staging/dev website – A very common feature among managed WordPress hosting providers is to create a staging and dev site. The staging site lives on a temporary URL and is a copy of your live website. You can make changes on dev site and push the changes to your live site once you’re done. Cloudways, Pantheon, and Siteground are some hosting providers that are known for providing this feature.
Backup current WordPress htaccess file – You can create backups of your htaccess file before making the edits. If anything breaks after editing htaccess, you can simply replace it with your backed up file.
How to Access .htaccess File
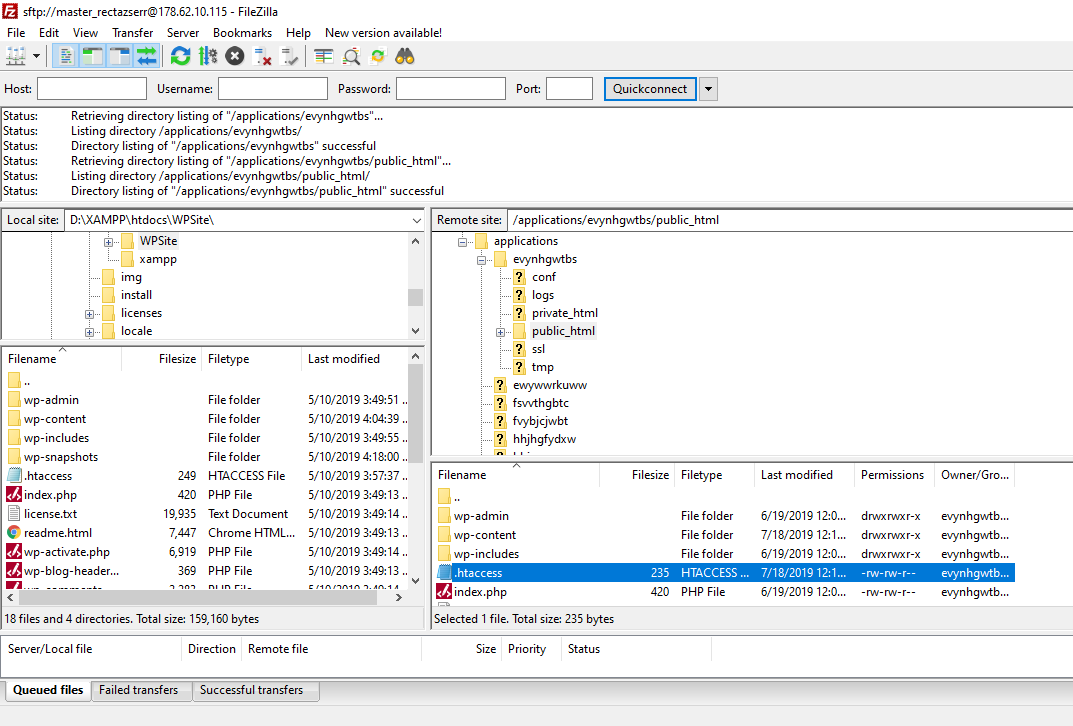
The first two questions that WordPress beginners will ask “Where is htaccess file in WordPress?” and “How to access htaccess file?”. Well, you can find htaccess file in the root directory (public_html) of your WordPress website and to access it you can use an FTP client like FileZilla.
If you can’t find htaccess file in the WordPress root directory, then maybe your WordPress website does not have a default htaccess file or your FTP client is not showing the hidden files. The htaccess is a hidden file by default, that is why it starts with a “.”.
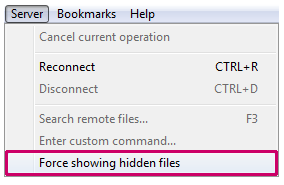
To enable viewing hidden files in FileZilla, do the following:
- Open the Filezilla FTP and connect to your webserver.
- Navigate to the root directory where WordPress is installed.
- From the menu bar at the top of the screen select Server.
- Select “Force showing hidden files”.
If you still can’t see any htaccess file after displaying the hidden files, that means your WordPress website does not have .htaccess file. Don’t worry, though, because your WordPress is running default rules for “permalinks”.
To generate the htaccess, login to your WordPress Admin, navigate to Settings > Permalinks and click on save changes.
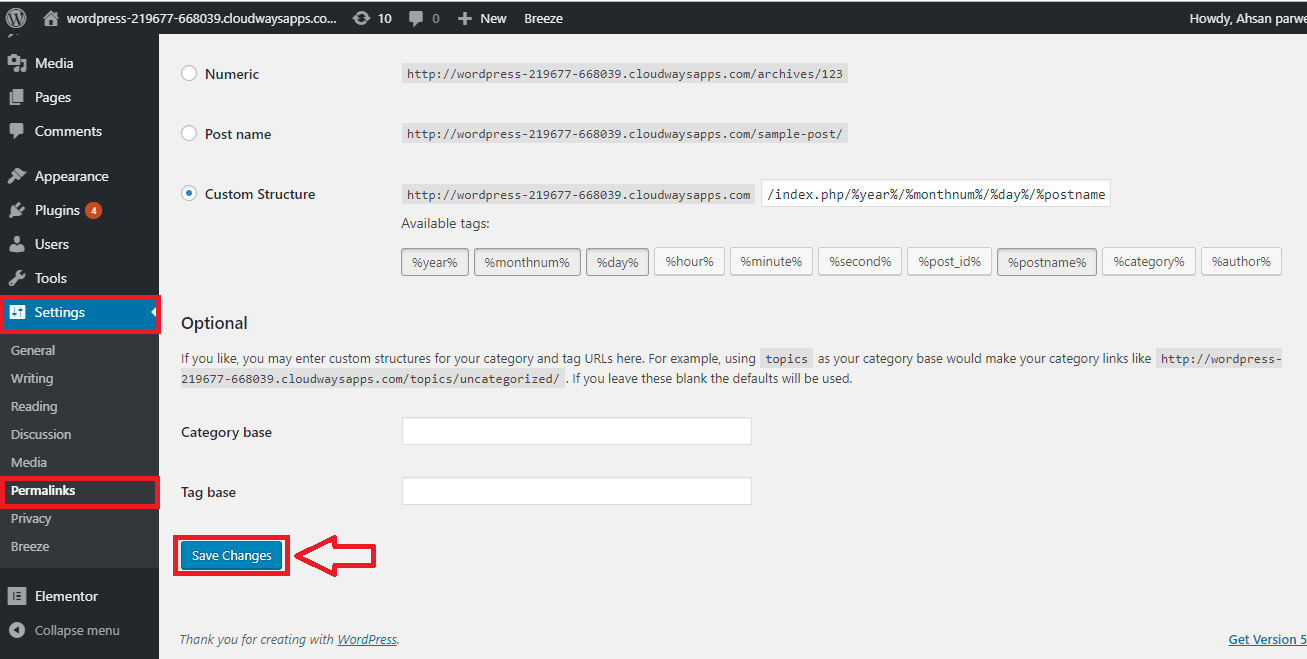
After doing this, refresh your FTP client screen and you will see the htaccess file with default the code.
|
1 2 3 4 5 6 7 8 9 10 |
# BEGIN WordPress RewriteEngine On RewriteBase / RewriteRule ^index\.php$ - [L] RewriteCond %{REQUEST_FILENAME} !-f RewriteCond %{REQUEST_FILENAME} !-d RewriteRule . /index.php [L] # END WordPress |
What Can You Do with htaccess File in WordPress
Now that you know how to get in htaccess file, it is time to take a deep dive into what specific rules you can define within the WordPress htaccess file. I’ll break down the rules into three categories:
- Redirect Rules
- Improving WordPress speed
- Making WordPress secure
Setting up Redirects
First, let’s cover the most common redirect rules you can implement on your WordPress website.
301 (Permanent) Redirect
The 301 redirect rule tells your visitor’s browser and the search engine bots that a certain URL has moved permanently to another URL. Here’s a common redirect rule that SEOs use to retain the ranking of their pages within SERPs:
Redirect 301 /oldpage.html http://www.yourwebsite.com/newpage.html
302 (Temporary) Redirect
If you’re working on the main URL and want to temporarily redirect visitors to another page for some time, then you may need to use a 302 redirect rule.
Redirect 302 /oldpage.html http://www.yourwebsite.com/newpage.html
Force URL to www
If you want your URL to always start with www then use the following code that will make your URLs consistent across the entire site:
|
1 2 3 |
RewriteEngine on RewriteCond %{HTTP_HOST} ^example.com [NC] RewriteRule ^(.*)$ http://www.example.com/$1 [L,R=301,NC] |
Force URL to Non-www
Similarly, if you prefer cleaner URLs without the www, the following code will do it for you:
|
1 2 3 |
RewriteEngine on RewriteCond %{HTTP_HOST} ^www.example.com [NC] RewriteRule ^(.*)$ http://example.com/$1 [L,R=301] |
Force HTTPs
If you’re using an SSL certificate on your WordPress website, you’d probably want all your visitors and search engine crawlers to redirect to the HTTPs version of your website. Use this code:
|
1 2 3 |
RewriteEngine On RewriteCond %{HTTP:X-Forwarded-Proto} !https RewriteRule ^(.*)$ https://%{HTTP_HOST}/$1 [R=301,L] |
Force HTTP
For forcing non HTTPs connections on your website, use the following code.
|
1 2 3 |
RewriteEngine On RewriteCond %{HTTP:X-Forwarded-Proto} ^https$ RewriteRule .* http://%{HTTP_HOST}%{REQUEST_URI}</IfModule> |
Redirect Domain To Sub-Directory
You can redirect a domain to a subdirectory using the following rule:
|
1 2 3 |
RewriteCond %{HTTP_HOST} ^example.com$ RewriteCond %{REQUEST_URI} !^/sub-directory-name/ RewriteRule (.*) /subdir/$1 |
Redirect a Primary Domain to Another Domain
If you have two or more domain names, for example, abc.com, abc.net, and abc.org, etc., and want all of them to redirect to one domain then you can add redirect rules in the domains that you want to redirect to your primary domain:
Redirect 301 / http://www.abc.com/
Add the above rule in abc.net and abc.org to make them redirect to abc.com.
Removing the Query_String
Your website URLs will display the same content when accessed by adding a query string in the end. For example myblog.com can also be accessed via myblog.com/?my=query. If these query strings get crawled by the search engines, this would create duplicate content.
And easy way to get rid of this issue is to redirect and remove query strings using this code:
|
1 2 3 |
RewriteCond %{THE_REQUEST} ^[A-Z]+ /.*\ HTTP RewriteCond %{QUERY_STRING} !^$ RewriteRule .* https://www.mywebsite.com%{REQUEST_URI}? [R=301,L] |
Setting the Language Variable Based on Client
For multilingual WordPress websites, the best way to redirect visitors to their preferred language is detecting their browser language and redirecting them to it by adding the following rule in the htaccess file:
|
1 2 |
RewriteCond %{HTTP:Accept-Language} ^.*(de|es|fr|it|ja|ru|en).*$ [NC] RewriteRule ^(.*)$ - [env=prefer-language:%1] |
Note: Many multilingual WordPress plugins do that on their own.
Redirecting WordPress Feeds to Feedburner
WordPress generates RSS feeds for posts by default, but if you’d like to use a third-party feed generator like Feedburner, then use the following code:
|
1 2 3 4 5 6 7 8 9 10 11 |
RewriteEngine On RewriteBase / RewriteCond %{REQUEST_URI} ^/feed\.gif$ RewriteRule .* - [L] RewriteCond %{HTTP_USER_AGENT} !^.*(FeedBurner|FeedValidator) [NC] RewriteRule ^feed/?.*$ http://feeds.feedburner.com/apache/htaccess [L,R=302] RewriteCond %{REQUEST_FILENAME} !-f RewriteCond %{REQUEST_FILENAME} !-d RewriteRule . /index.php [L] |
Optimizing WordPress Speed Using htaccess Rules
Many caching rules and expiry of WordPress assets can be set within the htaccess file. That means that you can actually add rules to optimize your WordPress website’s speed.
Set Expires Headers for Browser Cache
Many browsers today temporarily cache elements like CSS, JS, HTML and some media files like a favicon of frequently visited websites. If these elements on your WordPress site don’t change frequently, then you can increase the expiry times of these assets using the following rules:
|
1 2 3 4 5 6 7 8 9 10 11 12 13 14 15 16 17 18 19 20 21 22 23 24 25 26 27 28 29 30 31 32 33 34 35 36 37 38 |
<IfModule mod_expires.c> ExpiresActive on ExpiresDefault "access plus 1 month" # CSS ExpiresByType text/css "access plus 1 year" # Data interchange ExpiresByType application/json "access plus 0 seconds" ExpiresByType application/xml "access plus 0 seconds" ExpiresByType text/xml "access plus 0 seconds" # Favicon (cannot be renamed!) ExpiresByType image/x-icon "access plus 1 week" # HTML components (HTCs) ExpiresByType text/x-component "access plus 1 month" # HTML ExpiresByType text/html "access plus 0 seconds" # JavaScript ExpiresByType application/javascript "access plus 1 year" # Manifest files ExpiresByType application/x-web-app-manifest+json "access plus 0 seconds" ExpiresByType text/cache-manifest "access plus 0 seconds" # Media ExpiresByType audio/ogg "access plus 1 month" ExpiresByType image/gif "access plus 1 month" ExpiresByType image/jpeg "access plus 1 month" ExpiresByType image/png "access plus 1 month" ExpiresByType video/mp4 "access plus 1 month" ExpiresByType video/ogg "access plus 1 month" ExpiresByType video/webm "access plus 1 month" # Web feeds ExpiresByType application/atom+xml "access plus 1 hour" ExpiresByType application/rss+xml "access plus 1 hour" # Web fonts ExpiresByType application/font-woff2 "access plus 1 month" ExpiresByType application/font-woff "access plus 1 month" ExpiresByType application/vnd.ms-fontobject "access plus 1 month" ExpiresByType application/x-font-ttf "access plus 1 month" ExpiresByType font/opentype "access plus 1 month" ExpiresByType image/svg+xml "access plus 1 month" |
Enable Gzip Compression
GZIP is a compression method that has gained significant popularity and has become the standard compression method for many WordPress cache plugins. It compresses the files and creates temporary files to be used instead.
If you want to manually enable GZIP compression within a WordPress website, add the following rule to your htaccess file:
|
1 2 3 4 5 6 7 8 9 10 11 12 13 14 15 16 17 18 19 20 21 22 23 24 25 26 27 28 29 |
<IfModule mod_deflate.c> # Compress HTML, CSS, JavaScript, Text, XML and fonts AddOutputFilterByType DEFLATE application/javascript AddOutputFilterByType DEFLATE application/rss+xml AddOutputFilterByType DEFLATE application/vnd.ms-fontobject AddOutputFilterByType DEFLATE application/x-font AddOutputFilterByType DEFLATE application/x-font-opentype AddOutputFilterByType DEFLATE application/x-font-otf AddOutputFilterByType DEFLATE application/x-font-truetype AddOutputFilterByType DEFLATE application/x-font-ttf AddOutputFilterByType DEFLATE application/x-javascript AddOutputFilterByType DEFLATE application/xhtml+xml AddOutputFilterByType DEFLATE application/xml AddOutputFilterByType DEFLATE font/opentype AddOutputFilterByType DEFLATE font/otf AddOutputFilterByType DEFLATE font/ttf AddOutputFilterByType DEFLATE image/svg+xml AddOutputFilterByType DEFLATE image/x-icon AddOutputFilterByType DEFLATE text/css AddOutputFilterByType DEFLATE text/html AddOutputFilterByType DEFLATE text/javascript AddOutputFilterByType DEFLATE text/plain AddOutputFilterByType DEFLATE text/xml # Remove browser bugs (only needed for really old browsers) BrowserMatch ^Mozilla/4 gzip-only-text/html BrowserMatch ^Mozilla/4\.0[678] no-gzip BrowserMatch \bMSIE !no-gzip !gzip-only-text/html Header append Vary User-Agent </IfModule> |
Increasing Max Upload File Size Using WordPress htaccess File
This rule will let you upload larger files on your WordPress website. By default, the upload file size of many WP sites is around 10MB to 25MB, but if you want to increase it, use the following code:
|
1 2 3 4 |
php_value upload_max_filesize 64M php_value post_max_size 64M php_value max_execution_time 300 php_value max_input_time 300 |
there are many ways other ways also How to Increase WordPress Upload Size check that out 🙂
Improve Your WordPress Website’s Security
When it comes to security, there are htaccess rules that you can add to restrict user access to files or URLs, block access to files, and much more.
Protect .htaccess
An attacker can take down your entire website by injecting malicious rules into your htaccess file, hence, it’s important to protect it. Add the following rule to deny all access to htaccess file:
|
1 2 3 4 5 |
<files ~ "^.*\.([Hh][Tt][Aa])"> order allow,deny deny from all satisfy all </files> |
Restrict Access to WordPress Admin Panel
WordPress websites are prone to attacks, like Brute force attacks, that attempt to log in to your website admin. If you want to completely restrict access to your dashboard, create a new htaccess file and place it in /wp-admin folder and add the following code.
|
1 2 3 4 5 6 |
# Limit logins and admin by IP <Limit GET POST PUT> order deny,allow deny from all allow from xx.xx.xx.xx </Limit> |
Note: xx.xx.xx.xx is the IP address that you want to Whitelabel. Only this IP address will be able to login to your website.
Password Protect single file
You can protect files with a password using the following htaccess rules.
|
1 2 3 4 5 6 |
<Files login.php> AuthName "Prompt" AuthType Basic AuthUserFile /web/mywebsite.com/.htpasswd Require valid-user </Files> |
Secure Important Files
There are other critical files that you should protect, like php.ini, wp-config.php, and to do that, add the following rules to restrict access:
|
1 2 3 4 |
<FilesMatch "^.*(error_log|wp-config\.php|php.ini|\.[hH][tT][aApP].*)$"> Order deny,allow Deny from all </FilesMatch> |
Protect /wp-content/
The folder /wp-content contains the theme files, images, and cached files. The attackers will try to get access to the files within this folder and inject malicious codes. Use this code to keep them out:
|
1 2 3 4 5 |
Order deny,allow Deny from all <Files ~ ".(xml|css|jpe?g|png|gif|js)$"> Allow from all </Files> |
Block IP Address
If you know the attackers IP address (you can get the IP from your website logs) you can block it using the following htaccess rules:
|
1 2 3 4 5 |
<Limit GET POST> order allow,deny deny from 123.456.78.9 allow from all </Limit> |
Deny Access To Certain Files
Just like blocking a specific IP address, you can block access to specific files using this code:
|
1 2 3 4 |
<files your-file-name.txt> order allow,deny deny from all </files> |
Prevent Files image/file Hotlinking and Bandwidth Stealing
Images and files can be stolen and multiple requests against image and file URLs can be generated. This type of attack will increase your bandwidth usage and will potentially slow your website down. To prevent hotlinking, use the following htaccess rule:
|
1 2 3 4 5 |
RewriteEngine On RewriteBase / RewriteCond %{HTTP_REFERER} !^$ RewriteCond %{HTTP_REFERER} !^http://(www\.)?mywebsite\.com/.*$ [NC] RewriteRule \.(gif|jpg|swf|flv|png)$ /feed/ [R=302,L] |
Conclusion
The WordPress htaccess file is no doubt one of the most important files in the WordPress directory. Using it the right way will increase your website’s level of security and also help optimize its speed. Apart from security and speed, htaccess files have powerful rules to change the default behavior of your WordPress website. That is why I recommend each WordPress developer to have a deeper understanding of each rule that can be used within this file.
If you have any questions or would like to request a rule for anything specific, just use the comments section below and I’ll get back to you!

Create Faster WordPress Websites!
Free eBook on WordPress Performance right in your inbox.

Ahsan is the Community Team Manager at Cloudways - A Managed Cloud Hosting Platform. He loves to solve problems and help Cloudways' clients in any aspect he can. In his free time, you can find him playing RTS PC games.