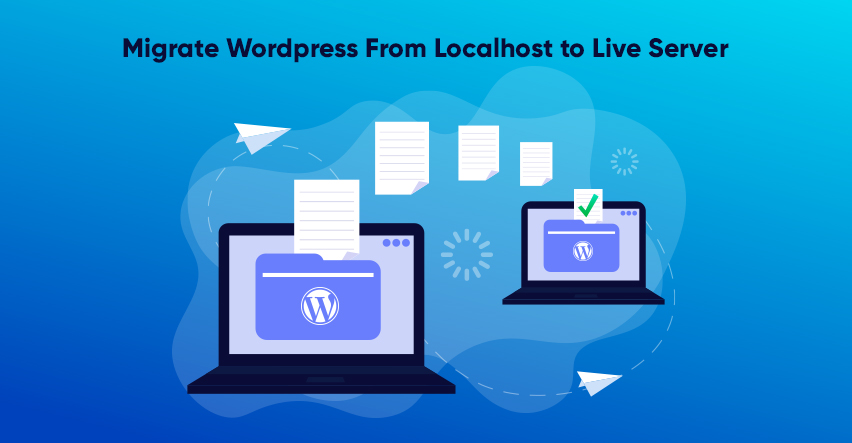
Migrate WordPress from Localhost to Live Server – A Step-by-Step Guide
Disclaimer: WPblog is a part of Cloudways, a Managed Cloud Hosting service, but any assumptions or analysis made on this property belong solely to their writers.
WordPress users, especially those who want to publish their WordPress site on a live server, have a common question “How to make a WordPress site live?”. Lucky for you, the answer to that question is simple: Use any of the two WordPress migration methods that we have covered in this article.
So your WordPress website is ready and now you want to move it from your localhost to live site/hosting, right. Building and testing your websites on your localhost is a good practice and even if something goes wrong, it doesn’t affect your live website.
Table Of Content:
So in this tutorial, I will go through the step-by-step configuration and will show you how to upload and transfer your WordPress site from a localhost to a hosting/live site in two simple methods:
- Migrate WordPress Site from localhost to live server using a plugin
- Manually migrating WordPress Site from localhost to live server
The first method is simple and I’d suggest it for both tech-savvy and non-tech-savvy users because it’s independent of your hosting providers. However, if you’re a Cloudways user, you’ll find that the manual method is an easy way to migrate your WordPress site as well.
Prerequisites:
To move your WordPress site from localhost to another server, you need to make sure that:
-
- You have a local server setup on your computer. (If you don’t, see our guide on how to install WordPress on localhost using XAMPP)
- You have a good web hosting plan that supports WordPress. (Here’s our list of the best WordPress hosting companies you can choose from)
- If want to update the PHP version on XAMPP. ( How to change PHP version on XAMPP)
While there are many great options, our recommended WordPress hosting is Cloudways, and we have partnered with them to bring our readers an exclusive 3 Months Off coupon code.
Note: I am using the Cloudways hosting platform for demonstrating the migration process for this tutorial.
Let’s get started!
Method 1: Migrate WordPress Site from Localhost to Live Server Using a Plugin
Here are all the steps I’ll take during this process to make navigation easier for you:
Step 1: Install and setup the Duplicator plugin on your Localhost WordPress
Step 2: Creating a package
Step 3: Transfer the Installer.php and Archive(zip) file via an FTP Client like FileZilla
Step 4: Run the Installer setup on the live server
Step 5: Transferring and Testing the live WordPress site
While I’m using the Duplicator plugin, here are some other migration plugins you can use for the process:
- Duplicator (Freemium)
- All-in-One WP Migration (Free)
- BackupBuddy (Premium)
- UpdraftPlus WordPress Backup Plugin (UpdraftPlus Migrator) (Freemium)
- WP Migrate DB (Premium)
- Migrate Guru (Premium)
- VaultPress (Premium)
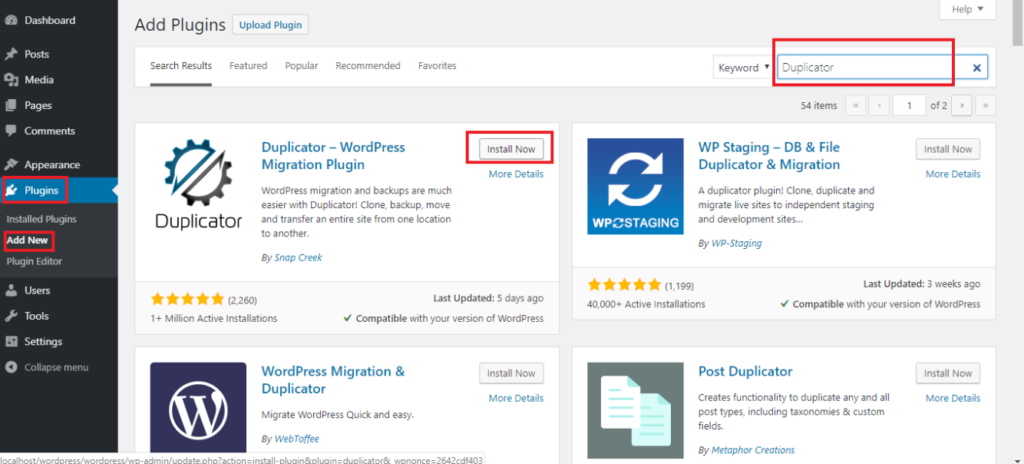
Step 1: Install and Setup Duplicator Plugin on Your Localhost WordPress
First, you need to install and activate the Duplicator plugin on your localhost WordPress site (i.e., on XAMPP). For that, go to ADD NEW plugin and type Duplicator in search and click on Install Now, and Activate it.
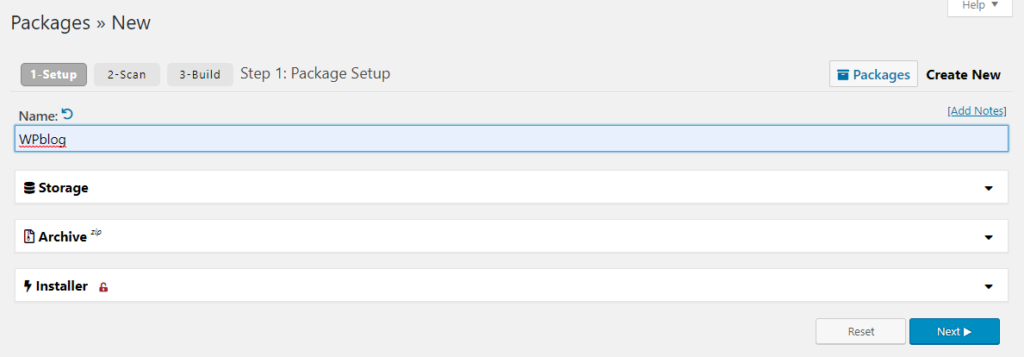
Step 2: Creating a Package
You will see the Duplicator menu on the left panel in the WordPress Dashboard. Click on Duplicator > Packages > Create New

Once the package is created, simply click on the Next Button.
Now click on the Build button.
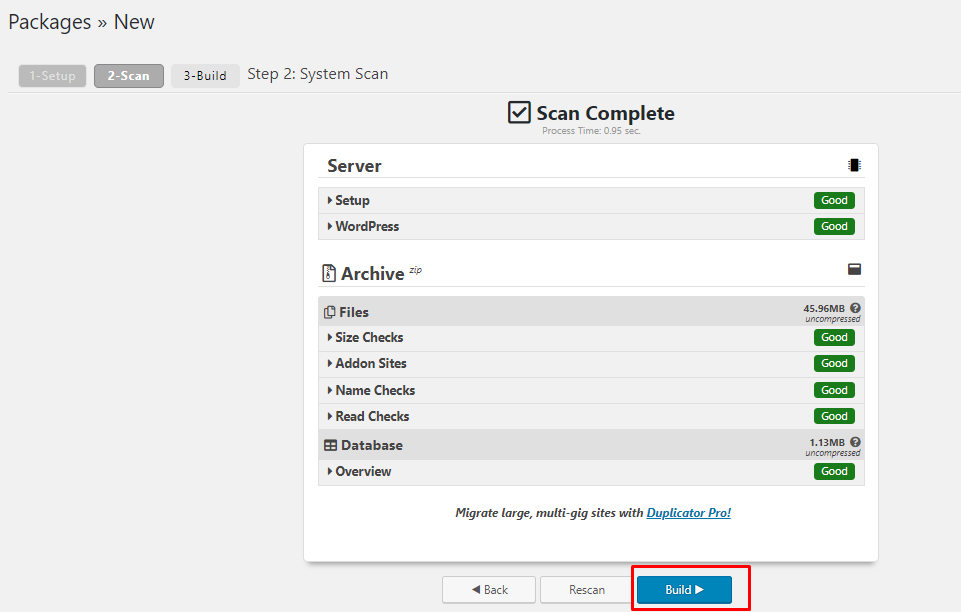
It will take a few seconds to build the package. The package creates a zip file of all the site’s plugins, themes, content, database, and WordPress files
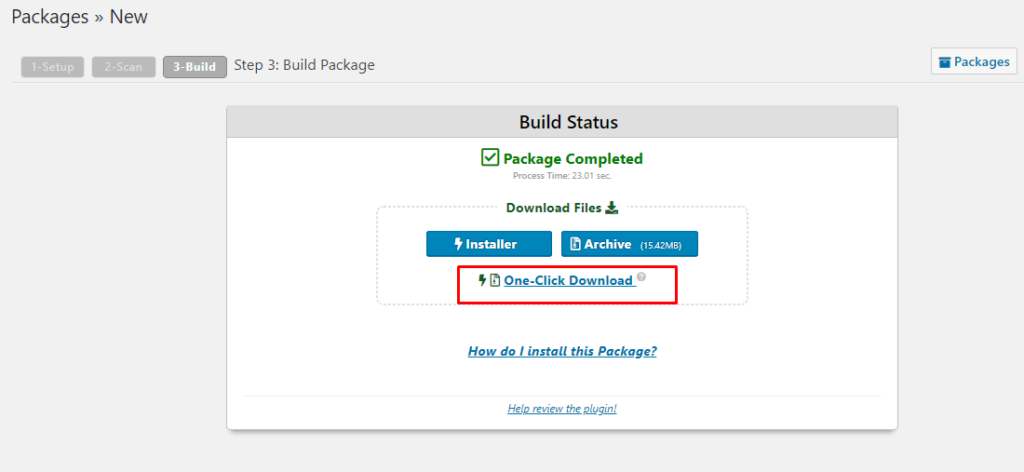
You can now download the two files by clicking on One-Click Download as shown in the image above.
Step 3: Transfer the Installer.php and Archive(zip) File to your Cloudways Live Server Via an FTP Client FileZilla
First, launch a new application hosting on Cloudways.
After launching the application, you need to download an FTP client like FileZilla. You can download it from FileZilla-Project.org.
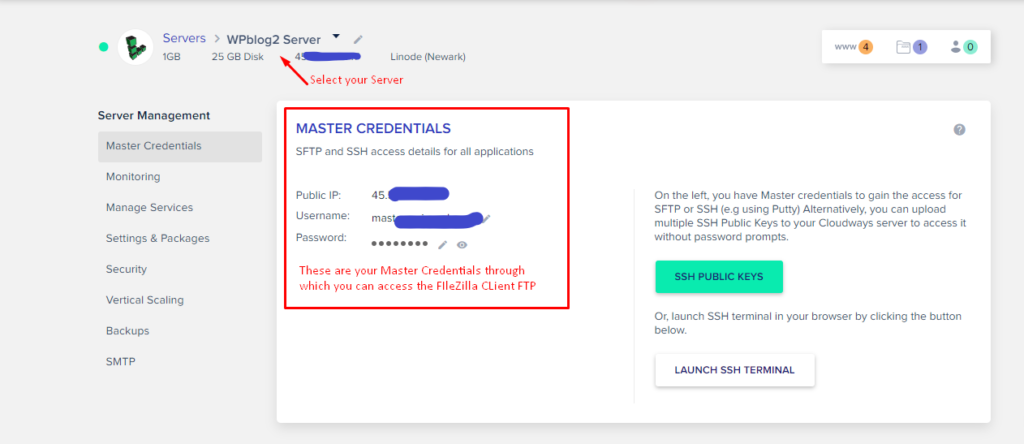
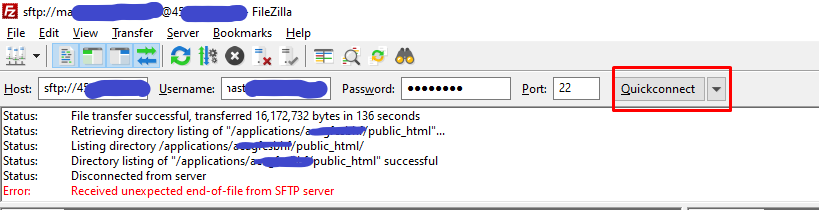
To connect FileZilla, you need to provide it the master credentials of your Server (Host IP, User, Password, and Port).
For FileZilla:
Host = Public IP of Cloudways
Username = Username of Cloudways
Password = The password of Cloudways
Port = 22
Note: For smooth running, please select port 22.
You can find all these details in your Master Credentials under Server Management in the Cloudways platform as shown in the image below.
After you’ve input the master credentials in the respective fields, click on Quickconnect.
Next, go to the Applications folder, select your DB Name folder (database name that’s in your Application access details), select the public_html folder and delete the WP-CONFIG.PHP file through FileZilla FTP, and upload the Installer and Archive files from your desktop to this folder.
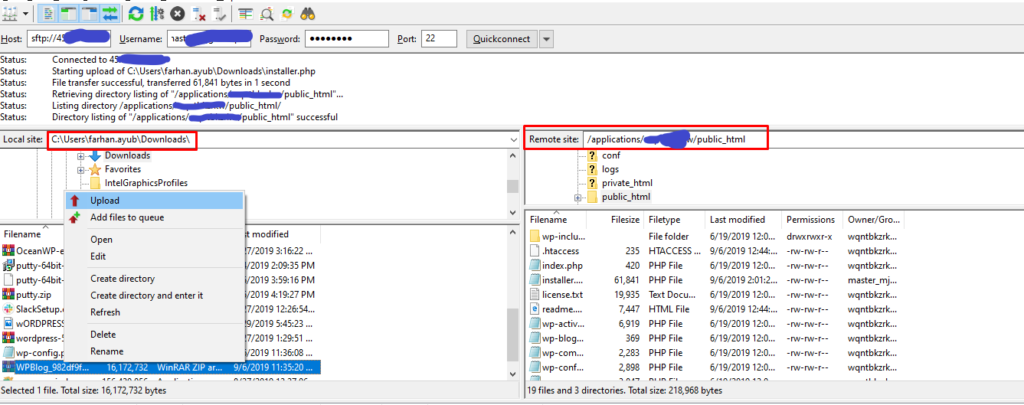
Note: Before you upload the archive files, make sure that you delete the wp-config.php file from your application (located in the public_html folder).
Step 4: Run the Installer Setup On the Live Server
Now that you’ve completed the uploading process in the steps above, you need to run your site URL.
Next, you will see the WordPress installing setup:
Just remove the “wp-admin/setup-config.php” from http://YourSiteName.com/wp-admin/setup-config.php URL and replace it with “Installer.php” http://YourSiteName.com/installer.php.
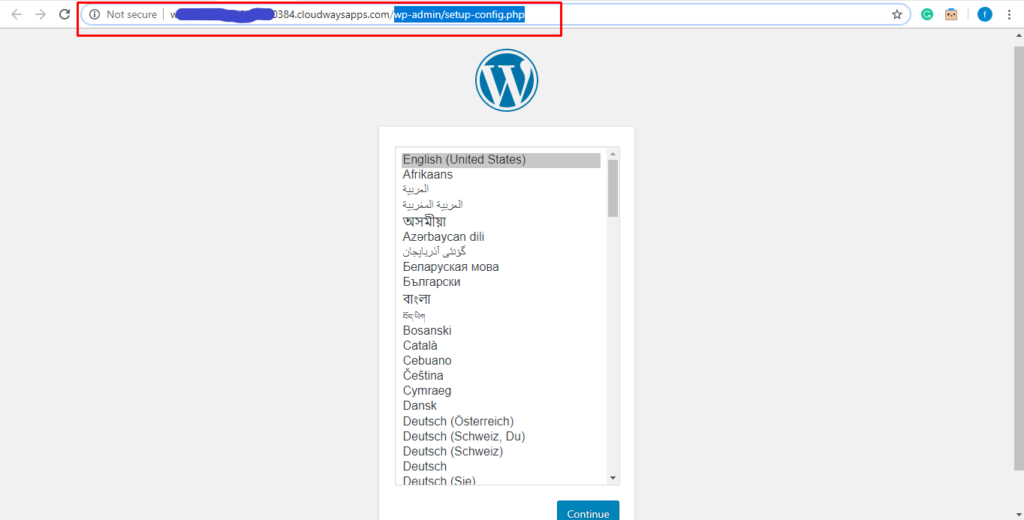
Replace it with “Installer.php” http://YourSiteName.com/installer.php.
![]()
When you enter the YourSiteName/installer.php URL, the following setup configuration will appear on your screen:
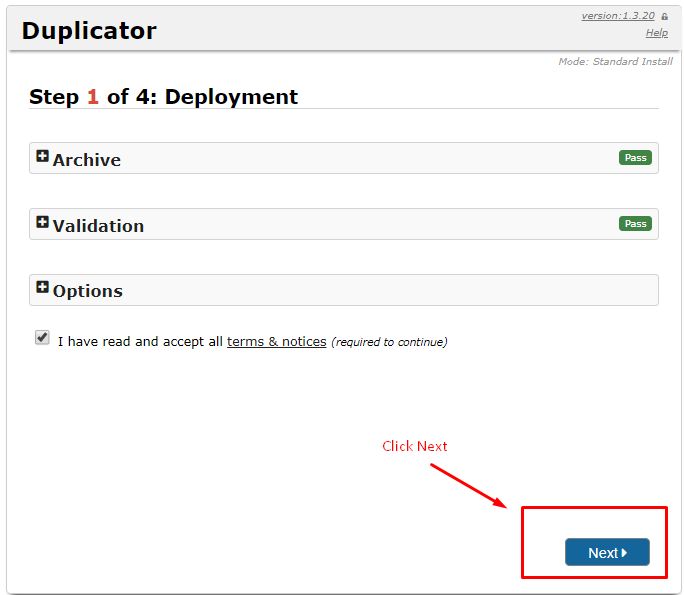
Just click on the Next button!
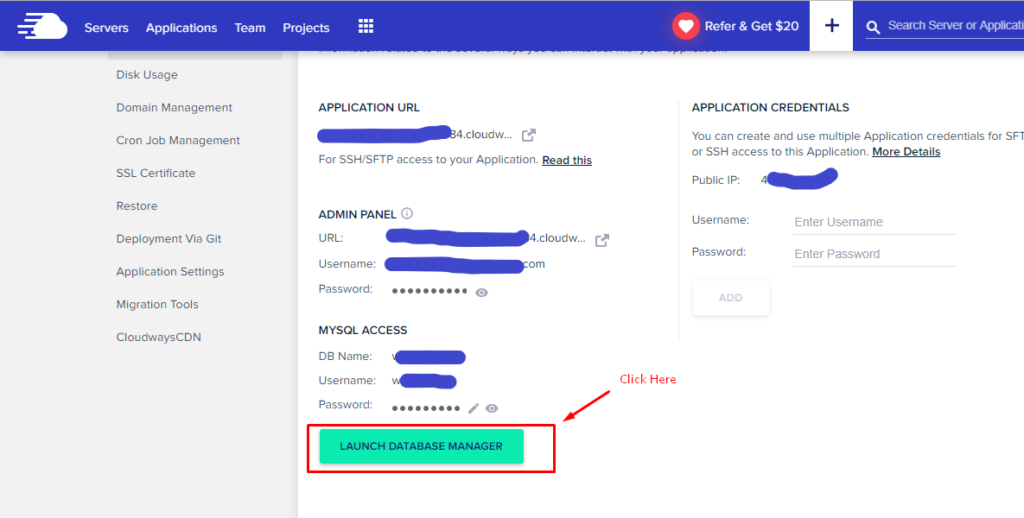
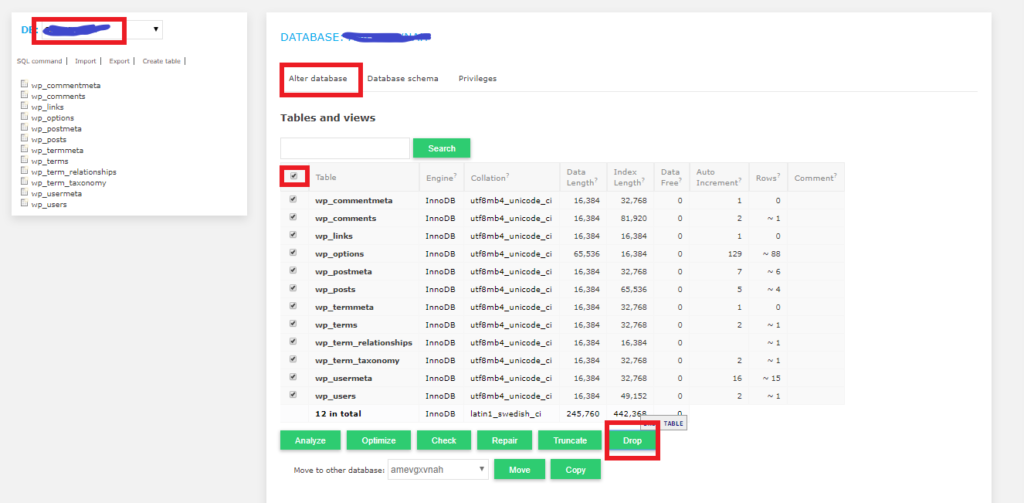
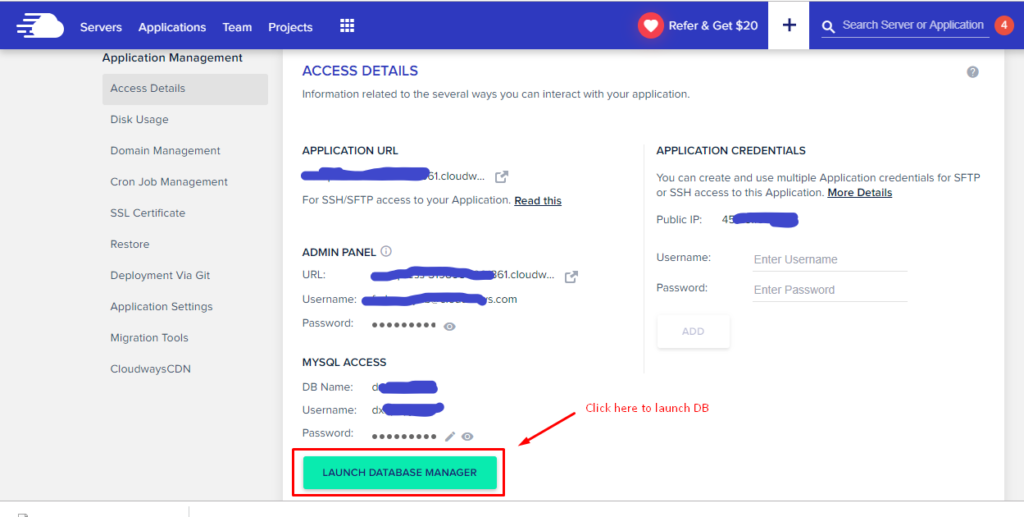
Note: The Duplicator plugin works best with empty databases. Hence, before moving forward, you need to remove all previous data. For this, go to Application Management and click on Launch Database Manager.
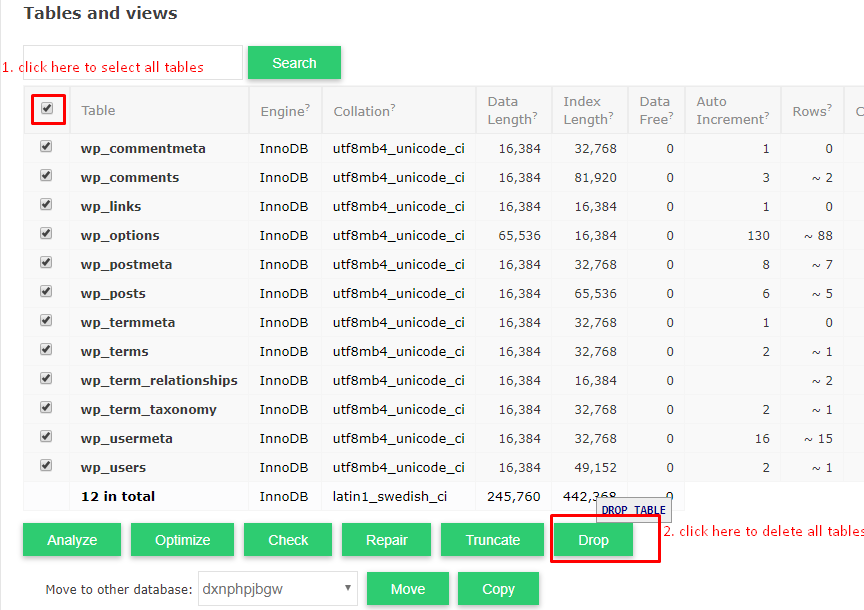
Now, you need to check on Tables to select all the tables in the database and click the Drop button to remove the selected tables as shown in the image below.
Now moving back to the Duplicator deployment Setup, you can continue with the configuration of duplicator by putting MySQL Access Credentials in the 2nd step.
Host = Localhost
Database = “Name of your DB”
User = “Username of your DB”
Password = “Password of your DB”
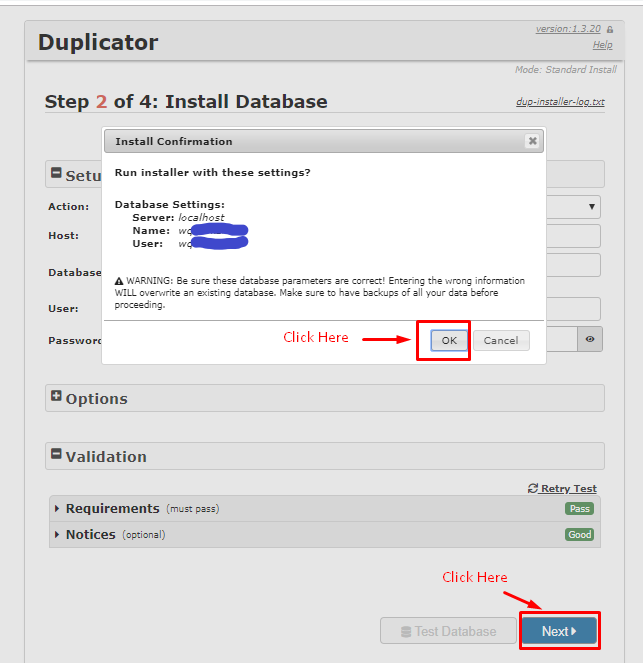
Now just click on NEXT to install the setup.
Step 5: Transferring and Testing the Live WordPress Site
Now you need to test it on a live site so just click on Admin Login, and the wp-login page will pop-up.
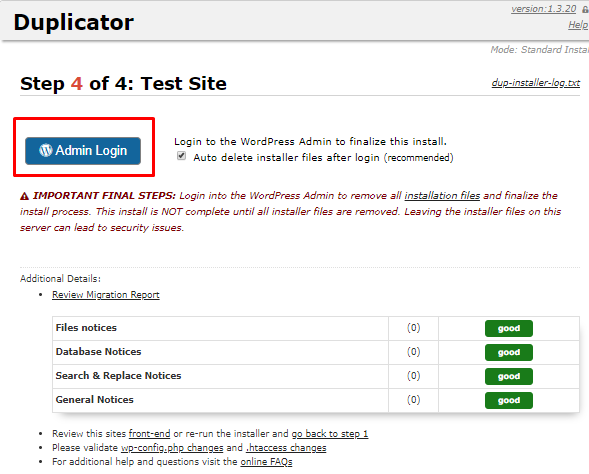
Next, you need to provide the Localhost WordPress Site admin credentials, i.e., the XAMPP credentials (not Cloudways access credentials).
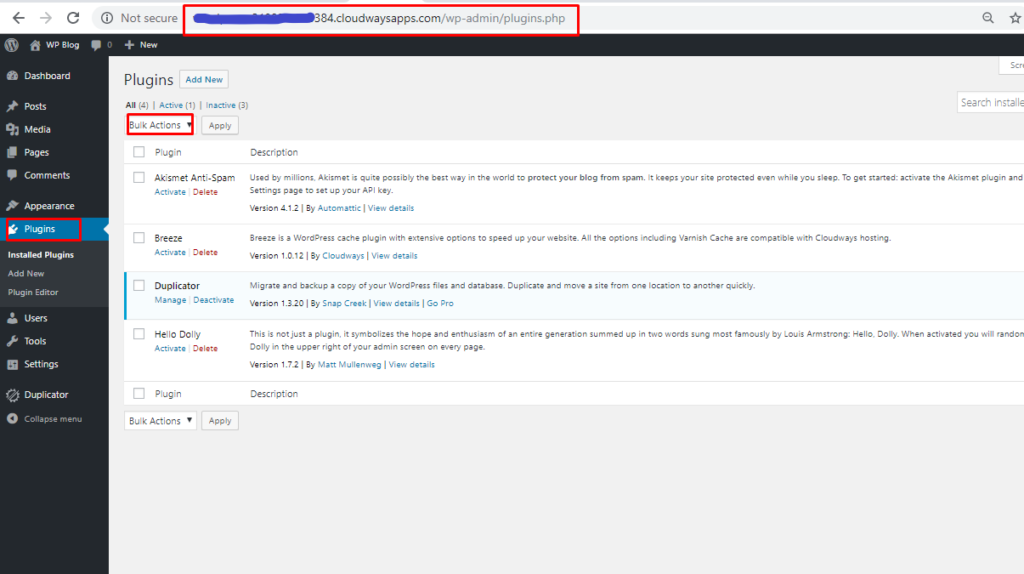
To stay on the safe side, deactivate all plugins when you migrate the WordPress site from a localhost to the Live server. To reactivate the deactivated plugins, navigate to Plugins > Installed Plugin, select Bulk Actions and click on the Activate button as shown in the image below.
As you can see, it’s not difficult to move a WordPress site from a localhost to a live server. Now you also know that the Duplicator plugin is a powerful tool and makes it easier to migrate your WordPress site to a live server.
Method 2: Manually Migrate WordPress Site from localhost to Live server
In this method, I’m going to show you how you can move your WordPress site manually from the localhost to live site/hosting.
While it’s already linked above, here’s how to launch a new application on a new server on Cloudways.
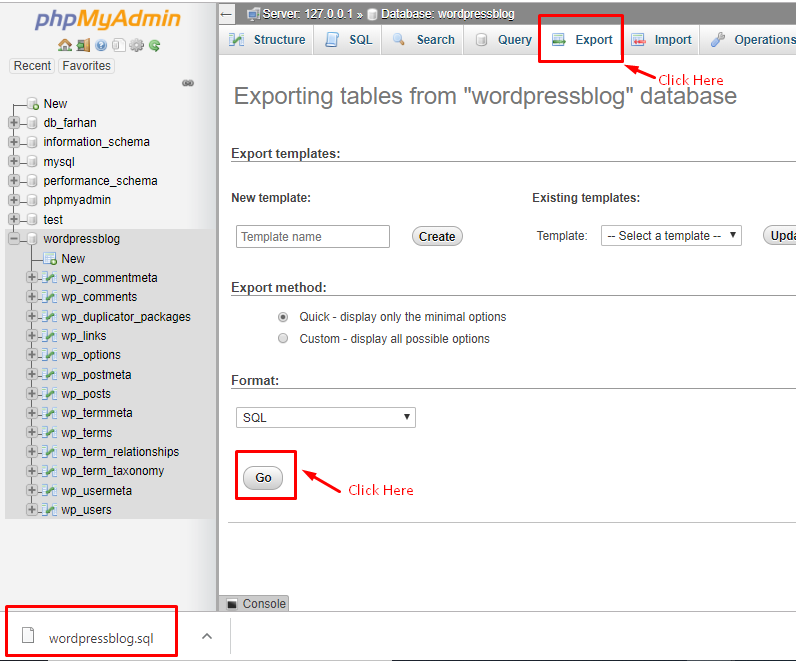
Step 1: Export Localhost WordPress Database
First, you need to export your Database file you created on XAMPP for WordPress.
Select your localhost WordPress DB and click on Export > Quick Export Method > Go, and you’ll see a “.SQL” file in your download folder.
Step 2: Delete Database Tables From your Hosting DB
The next step in the process is to launch your Database Manager by clicking on the Launch Database Manager button.
Next, you need to delete all the tables by checking Tables and clicking on the Drop button.
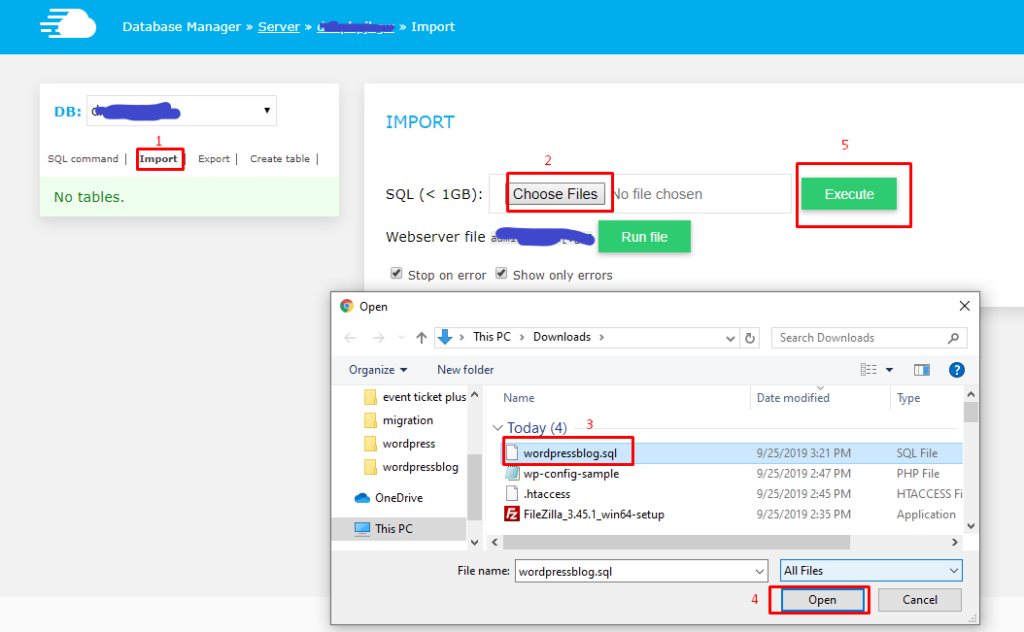
Step 3: Import Localhost WordPress Database on Live Site:
Now, the next in the process is to import that “.SQL” database file to your hosting DB. For this, you need to click on Import > Choose Files, then select .SQL file from your folder and click on the Open button, and click on Execute.
Step 4: Change the Site URL, Home, and Blog name:
Next, you need to change your Site URL, Home, and Blog name for live server.
Next, look for wp_options table in your database.
Note: If you had changed your prefix at installation then it might be _options.
Now, click on wp_options or <prefix>_options, and click on Select Data.
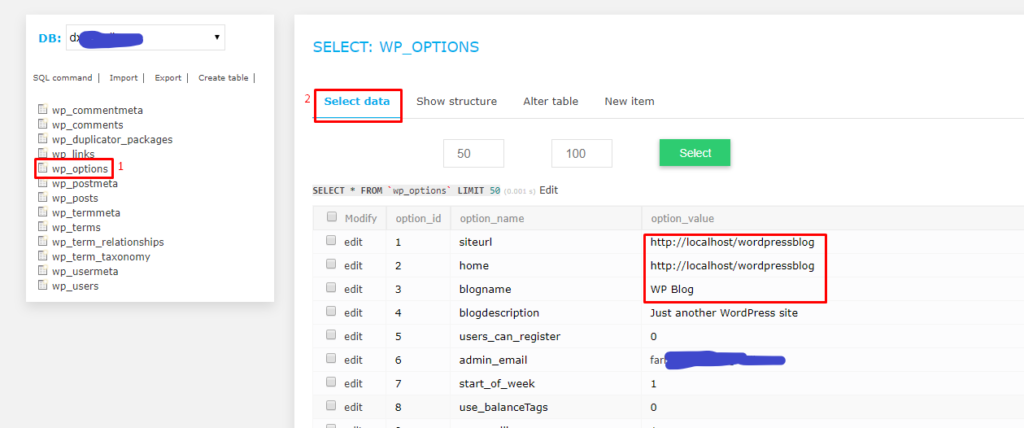
Here you just need to change 3 names:
Site URL = “your Site URL”
Home = “Your Site URL”
Blog name = “Your Site URL without HTTPS://”
This is “your Site URL” that you need to copy.
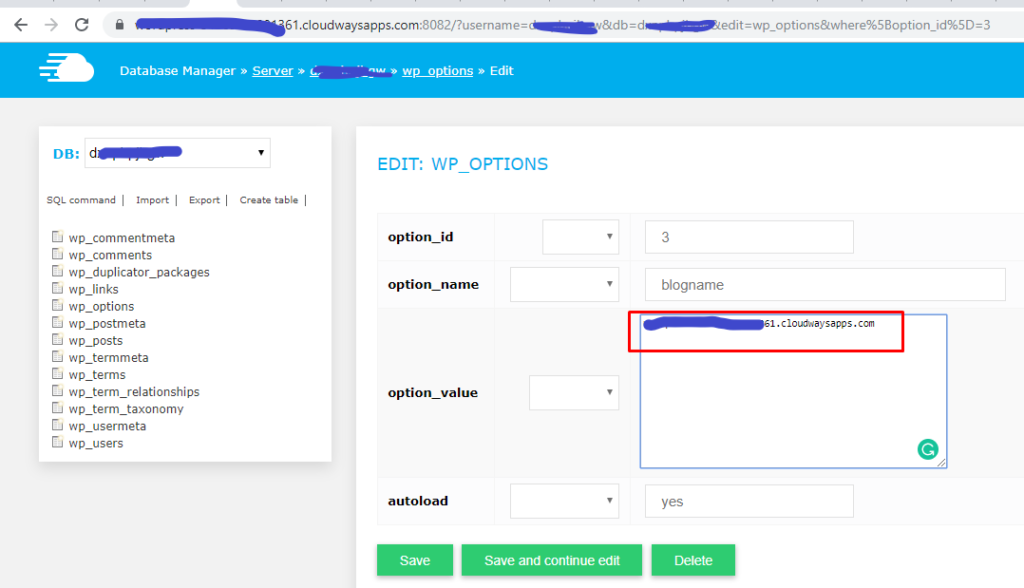
Click on edit for each highlighted option names mentioned above and insert the above-mentioned values in the option_value field. Your local install URL will probably look something like http://localhost/test.
Then, just click on Save and you’re done.
Congratulations! You have successfully migrated the WordPress site from localhost to a live site.
Conclusion
I hope the article helped you understand “How to make WordPress site live” and also how to publish your WordPress site on a cloud server.
Now that you know both processes of taking your WordPress website from Localhost to a live server, I’m sure you think it’s an easy process. For the first step, it’s the Duplicator plugin that makes this WordPress migration so simple. Secondly, it’s the Cloudways’ intuitive platform which makes the manual WordPress migration easy as well. So now your website is ready, do you have a cool domain name to go with it? If not, here’s an article on how to choose a perfect domain name for your site.
After you have your domain name and website up and running, you’re all set to make a mark online!

Create Faster WordPress Websites!
Free eBook on WordPress Performance right in your inbox.

Farhan is a community manager at WPblog. He loves to work with WordPress and has a passion for web development. Mostly, he spends his time interacting with the people in the WordPress community. Apart from his work life, Farhan spends his time gaming and playing sports. Feel free to contact him at Farhan[at]wpblog.com.